Tag Archives: winter

Commission Lapghan

Recently, I completed a lapghan on commission for a lovely elderly lady. I did not follow any pattern, but made it up as I went along. I used a variegated yarn, and 4.5mm hook. Here is what the end result.

I am particularly pleased with how the edging came out . I used a surface crochet technique to create the beige edging. Here is a close up:

Hope it inspires you!

A uber-soft baby blanket

I came across this super soft thick yarn – the Katia Bambi range and fell in love with the colours as well the texture – it is so luxurious and velvety – and ideal for a baby blanket. So, I decided to make a modern granny square version and not being a fan of the traditional pink or blue, opted for a more neutral combination of lilac and yellow.

While the yarn is gorgeous, it is not very forgiving if you need to do any rework – so, avoid making mistakes :).

Hope it inspires you!

Froggie Bonnet – a slightly different version

It’s been a while since I’ve published a post, but rest assured, I haven’t been crochet idle (ha ha – is that even a term?) – While I haven’t spent as much time as I would have liked on projects, here is a commission I recently completed.

A while back, I published a post with a free pattern for a froggie bonnet. I was asked if I could make a slight variation of that with the main differences being the straps are ribbed and are extension of the rib border. I also thought that the eye’s would look awesome with a bit of a sparkle, so decided to use a yarn with a gold strand through it.

The biggest challenge, believe it or not, was actually positioning the eyes. Once that was sorted, the bonnet finally made its way to it’s new owner, Amelie – and here she is!

Easy Knitted scarf

It’s been quite a few years since I last knitted anything, as normally I prefer crochet. But, I came across this lovely yarn, and needed a project to use it for (I know – that’s the wrong order of doing things – i.e. you should have a project in mind, and then you find the material – but I’m sure crafters know exactly what I mean and are likely guilty of the same!)

Anyhow, the yarn I used is Katia’s Easy Jacquard – and it came with a free pattern (you can find it here: https://www.katia.com/EN/patterns-autumn-winter-woman-set-8030-430.html) . My version is somewhat different as I wanted a thicker scarf. To achieve that, I worked the whole scarf in rib stitch. See below:

Instructions:

Using 4.5mm needles, Cast on 46 stitches.
Row: Repeat (K2, P2) till end of the row.
Make as many rows as you like till the scarf is of the desired length. (I used the entire ball, and my scarf is pretty long)

This is an ideal pattern to follow while watching your favourite shows – if you are like me, I can’t just sit and watch a show, I have to be doing something as well.

Hope this inspires you to pick up your hooks or needles and get crafting!

The Virus Shawl

Hey everyone! Hope you are all enjoying summer and safe ! I might have mentioned once or twice, or a hundred times that I love winter – I am totally a winter person. I love being able to snuggle with soft, warm woolly things – so it is no surprise that I make a lot of winter projects.

Firstly, a little disclaimer about the title of this post and the name of this pattern i.e. “The Virus Shawl” – this name and pattern has been around for years and has nothing to do with COVID-19.

I have made a few shawls so far, but it’s always been a challenge to properly show-case these without a model. I have asked politely, then begged and even tried to bribe my lovely daughter into being my model – but with no luck . So, I now am a proud owner of a mannequin!

Here is one of the shawls that I made . There are several free patterns available online.  However, here is one you could refer to – it includes a written pattern in form of graph as well as YouTube videos for both right and left-handed crocheters. If you do try making this, I would love to see your creations! Please feel free to share in comments to this post : https://www.woolpedia.de/english/crochet-tutorials/shawl/

N.B. I used a variegated 4-ply yarn, and used a 4-mm hook.

This slideshow requires JavaScript.

Pastel Flower Baby blanket

20200211_082609

I’m so happy with this gorgeous baby blanket which I made for a friend . It’s using the same technique as in my last post (Colourful Lapghan). Next up will be a cute little girls handbag…..keep a lookout for it!

Infinity Scarf

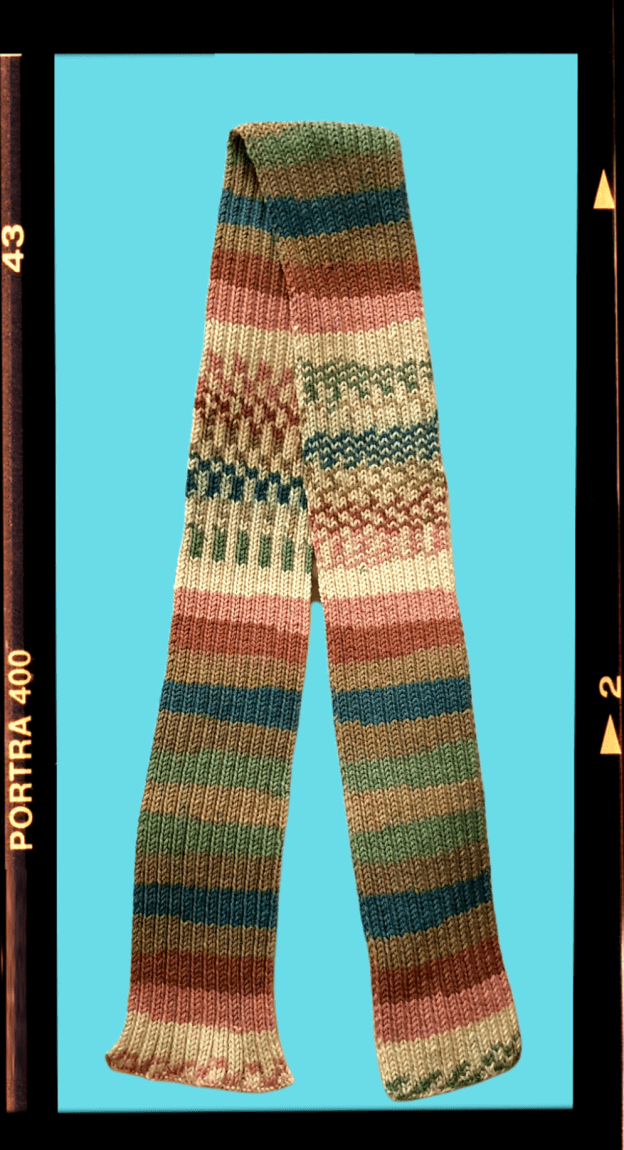
I love winter, and it is slowly on it’s way in 🙂 One of the things I love about winter is the clothes – those warm, soft & fluffy woolies, in which you wrap up tight.  So, here is my first project in preparation for this season : the infinity scarf.

I love infinity scarves as they are so versatile and you can wear them in many ways.

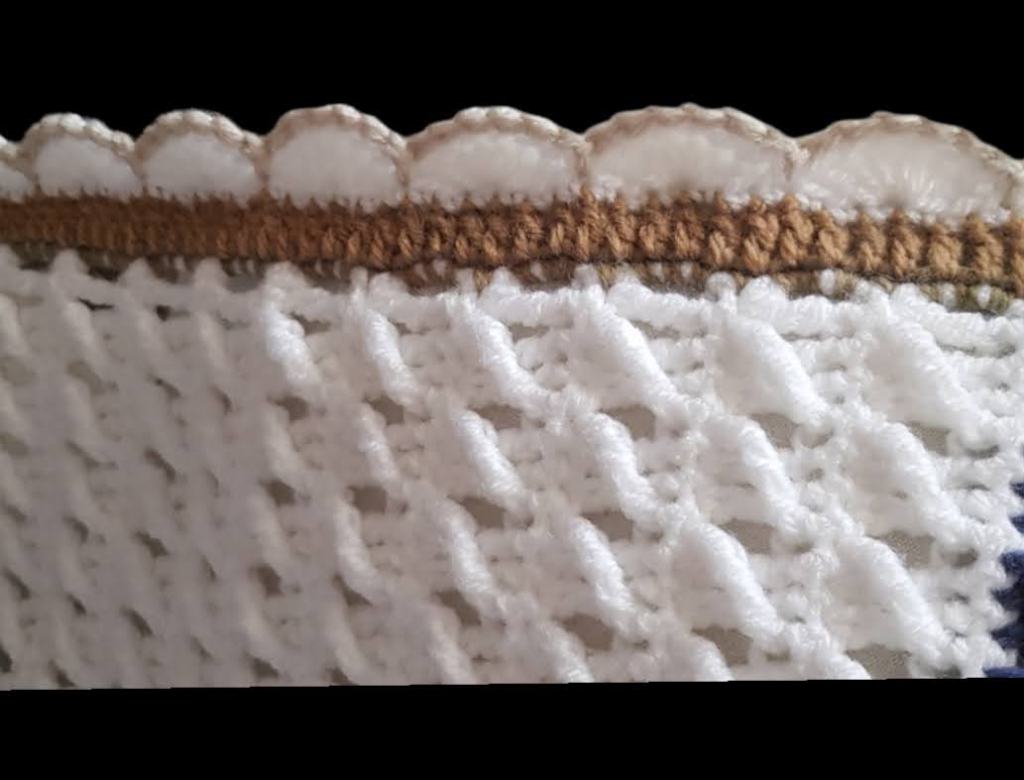
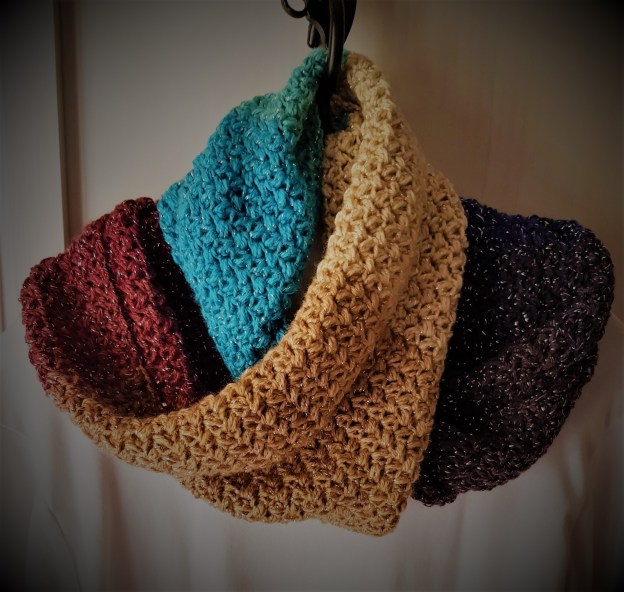
For this one, I have used a variagated yarn by Katia which has a gold thread running through it, but you can use any yarn of your choice. As for stitch choice, I used the puff stitch because it forms double-sided bobbles that are both thick and fluffy – just what you want for your scarf.

This is a really easy project, and in case you have not made a puff stitch before, here is an explanation :

Step 1 : –  Start by making a chain ( it should be in multiples of 2 stitches plus 4) till it is as wide as you would like your scarf to be.

Step 2: – Once you have made the chain, yarn over hook and insert the hook into the 4th chain from hook. Yarn over again and draw up a loop. You should have three loops on your hook. ** Yarn over hook and insert the hook into the same 4th chain from hook. Yarn over again and draw up a loop. ** Repeat from. You should now have 7  loops on the hook. (N.B. some people will even make puff stitches with 9 or 11 loops – it’s totally upto you – but I opted for 7.)

Step 3 : – Yarn over and draw the yarn through all the loops. This is your Puff Stitch.

Step 4: – With the loop pulled through the puff stitch, make a single chain to secure your Puff stitch.

Step 5: – Skip 1 chain stitch and make your next puff stitch in the next chain stitch. Repeat till you get to the end of the chain. You should end the row with a puff stitch.

Step 6: – At the end of your row, flip your work and make 3 chain stitches.

Step 7:- For all subsequent rows, make your puff stitches in the chain-1 space from the previous row.

Repeat till the scarf is as long as you like. Once done, I joined the last row to the initial row with slip stiches – but you can sew this if you prefer.

Enjoy!!