Author Archives: manjrisplace

Beach dress – written pattern

Update – September 2026: The original graph pattern I used for this project is no longer available at the link included when I first wrote this post in 2020.

The beach dress was originally based on a Katia graph pattern for a size 8–10 dress. As I found the graph quite difficult to follow, I worked through it and prepared the written, row-by-row version below while making my own dress.

I also experimented with making the dress as one continuous piece rather than creating separate front and back pieces, but after quite a bit of frogging 😊 I found that working the two pieces separately was much easier for maintaining the symmetry. That’s the version I’ve written out below.

I also changed the straps, making fixed straps for my version.

The original Katia graph is no longer available at the link I originally shared, so I’ve removed the broken link. I’ve kept my written version here as part of the Manjri’s Place crochet archive.

Enjoy! 🧶

Crochet hook size used: 3mm and 4mm

Yarn: Katia Jaipur cake

Stitches:

CH – chain stitch
SC – single crochet
DC – double crochet
DC3tog – DC 3 together

We will be making the front and back of the dress (which are identical) separately and then stitch them together at the end.

In addition, the pattern calls for making 4 straps and then stitching them to the back and front pieces.

STRAPS (make 4)
Using the 4mm crochet hook and 3 strands of yarn, work a strip of chain stitch measuring 40cm long. Cut the yarn and fasten off.

BACK
Using 3mm crochet hook, CH 83.

Row 1: CH 3, DC3tog (1st DC is CH 3, 2nd DC is made in CH 5 from hook) , 38 DC, 5 DC in next CH, 38 DC, DC3tog

Row 2 – 4: DC3tog (1st DC is CH 3) , 38 DC, 5 DC in next DC, 38 DC, DC3tog

Row 5: CH, [(SC, CH, skip DC) x 20], (SC, CH, SC) in next DC, [(CH, skip DC, SC) X 20], SC.

Row 6 : CH, SC, [(SC, CH, skip DC) x 20], (SC, CH, SC) in next CH, [(CH, skip DC, SC) X 21].

Row 7: CH 3, 42 DC, 5 DC in next CH, 43 DC

Row 8: CH 3, 44 DC, 5 DC in next DC, 45 DC

Row 9: CH 3, 46 DC, 5 DC in next DC, 47 DC

Row 10: CH 3, 48 DC, 5 DC in next DC, 49 DC

Row 11: CH, [(SC, CH, skip DC) x 25], (SC, CH, SC) in next DC, [(CH, skip DC, SC) X 25], SC.

Row 12 : CH, SC, [(SC, CH, skip DC) x 25], (SC, CH, SC) in next CH, [(CH, skip DC, SC) X 26].

Row 13: CH 3, 52 DC, 5 DC in next CH, 53 DC

Row 14: CH 3, 54 DC, 5 DC in next DC, 55 DC

Row 15: CH 3, 56 DC, 5 DC in next DC, 57 DC

Row 16: CH 3, 58 DC, 5 DC in next DC, 59 DC

Row 17: CH, [(SC, CH, skip DC) x 30], (SC, CH, SC) in next DC, [(CH, skip DC, SC) X 30], SC.

Row 18 : CH, SC, [(SC, CH, skip DC) x 30], (SC, CH, SC) in next CH, [(CH, skip DC, SC) X 31].

Row 19: DC3tog (1st DC is CH 3) , 61 DC, 5 DC in next CH, 60 DC, DC3tog

Row 20: DC3tog (1st DC is CH 3) , 60 DC, 5 DC in next DC, 61 DC, DC3tog

Row 21: DC3tog (1st DC is CH 3) , 61 DC, 5 DC in next DC, 60 DC, DC3tog

Row 22: DC3tog (1st DC is CH 3) , 60 DC, 5 DC in next DC, 61 DC, DC3tog

Row 23 : CH, SC, [(SC, CH, skip DC) x 31], (SC, CH, SC) in next DC, [(CH, skip DC, SC) X 31], SC.

Row 24 : CH, SC, [(SC, CH, skip DC) x 31], (SC, CH, SC) in next SC, [(CH, skip DC, SC) X 31], SC.

Row 25: DC3tog (1st DC is CH 3) , 63 DC, 5 DC in next CH, 62 DC, DC3tog

Row 26: DC3tog (1st DC is CH 3) , 62 DC, 5 DC in next DC, 63 DC, DC3tog

Row 27: DC3tog (1st DC is CH 3) , 63 DC, 5 DC in next DC, 62 DC, DC3tog

Row 28: DC3tog (1st DC is CH 3) , 62 DC, 5 DC in next DC, 63 DC, DC3tog

Row 29 : CH, SC, [(SC, CH, skip DC) x 32], (SC, CH, SC) in next DC, [(CH, skip DC, SC) X 32], SC.

Row 30 : CH, SC, [(SC, CH, skip DC) x 32], (SC, CH, SC) in next CH, [(CH, skip DC, SC) X 32], SC.

Row 31: DC3tog (1st DC is CH 3) , 65 DC, 5 DC in next CH, 64 DC, DC3tog

Row 32: DC3tog (1st DC is CH 3) , 64 DC, 5 DC in next DC, 65 DC, DC3tog

Row 33: DC3tog (1st DC is CH 3) , 65 DC, 5 DC in next DC, 64 DC, DC3tog

Row 34: DC3tog (1st DC is CH 3) , 64 DC, 5 DC in next DC, 65 DC, DC3tog

Row 35 : CH, [(SC, CH, skip DC) x 33], (SC, CH, SC) in next DC, [(CH, skip DC, SC) X 33], SC.

Row 36 : CH, SC, [(SC, CH, skip DC) x 33], (SC, CH, SC) in next CH, [(CH, skip DC, SC) X 34].

Row 37: CH 3, 68 DC, 5 DC in next CH, 69 DC

Row 38: DC3tog (1st DC is CH 3) , 68 DC, 5 DC in next DC, 68 DC, DC3tog

Row 39: CH 3, 70 DC, 5 DC in next DC, 71 DC

Row 40: DC3tog (1st DC is CH 3) , 70 DC, 5 DC in next DC, 70 DC, DC3tog

Row 41 : CH, [(SC, CH, skip DC) x 36], (SC, CH, SC) in next DC, [(CH, skip DC, SC) X 36], SC.

Row 42 : CH, SC, [(SC, CH, skip DC) x 36], (SC, CH, SC) in next CH, [(CH, skip DC, SC) X 36].

Row 43: CH 3, 74 DC, 5 DC in next CH, 75 DC

Row 44: DC3tog (1st DC is CH 3) , 74 DC, 5 DC in next DC, 74 DC, DC3tog

Row 45: CH 3, 76 DC, 5 DC in next DC, 77 DC

Row 46: DC3tog (1st DC is CH 3) , 76 DC, 5 DC in next DC, 76 DC, DC3tog

Row 47 : CH, [(SC, CH, skip DC) x 39], (SC, CH, SC) in next DC, [(CH, skip DC, SC) X 39], SC.

Row 48 : CH, SC, [(SC, CH, skip DC) x 39], (SC, CH, SC) in next CH, [(CH, skip DC, SC) X 40].

Row 49 – 52: DC3tog (1st DC is CH 3) , 78 DC, 5 DC in next DC, 78 DC, DC3tog

Row 53 : CH, [(SC, CH, skip DC) x 40], (SC, CH, SC) in next DC, [(CH, skip DC, SC) X 40], SC.

Row 54 : CH, SC, [(SC, CH, skip DC) x 40], (SC, CH, SC) in next CH, [(CH, skip DC, SC) X 41].

Row 55: DC3tog (1st DC is CH 3) , 80 DC, 5 DC in next CH, 80 DC, DC3tog

Row 56 – 58: DC3tog (1st DC is CH 3) , 80 DC, 5 DC in next DC, 80 DC, DC3tog

Row 59 : CH, [(SC, CH, skip DC) x 41], (SC, CH, SC) in next DC, [(CH, skip DC, SC) X 41], SC.

Row 60 : CH, SC, [(SC, CH, skip DC) x 41], (SC, CH, SC) in next CH, [(CH, skip DC, SC) X 42].

Row 61: DC3tog (1st DC is CH 3) , 82 DC, 5 DC in next CH, 82 DC, DC3tog

Row 62 – 64: DC3tog (1st DC is CH 3) , 82 DC, 5 DC in next DC, 82 DC, DC3tog

Row 65 : CH, [(SC, CH, skip DC) x 42], (SC, CH, SC) in next DC, [(CH, skip DC, SC) X 42], SC.

Row 66 : CH, SC, [(SC, CH, skip DC) x 42], (SC, CH, SC) in next CH, [(CH, skip DC, SC) X 43].

Row 67: DC3tog (1st DC is CH 3) , 84 DC, 5 DC in next CH, 84 DC, DC3tog

Row 68 – 70: DC3tog (1st DC is CH 3) , 84 DC, 5 DC in next DC, 84 DC, DC3tog

FRONT
Work the same as the Back.

FINISHING
Sew on straps: Attach one strap to each end of the starting row of Front and Back pieces.
Sew the sides: align the back and front pieces and sew from end (row 70) up until row 16.

See the finished Crochet Summer Beach Dress →

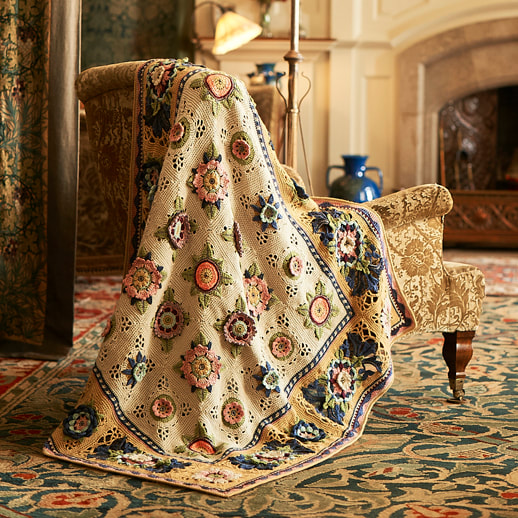
Stylecraft Fruit Garden Crochet Along (CAL) by Jane Crowfoot

A little note: I originally wrote this post in May 2020, when the Fruit Garden CAL was just getting underway. I’ve kept the original post below as part of my crochet journal, so references to pattern releases and dates reflect what was happening at the time.

I recently came across a post in one of the Facebook crochet groups for a most beautiful Crochet-Along (CAL) project inspired by embroidery works by May Morris, daughter of William Morris. I could not resist – so I signed up, bought the yarn pack and have just started.

As we have just started, only the first part of the pattern has been released, and I can say that it is written very clearly. The designer has also provided a Youtube video, in which she has shared some really good tips. I will surely be applying some of the tips to all my projects henceforth – so very worth taking a look.

20200503_141016
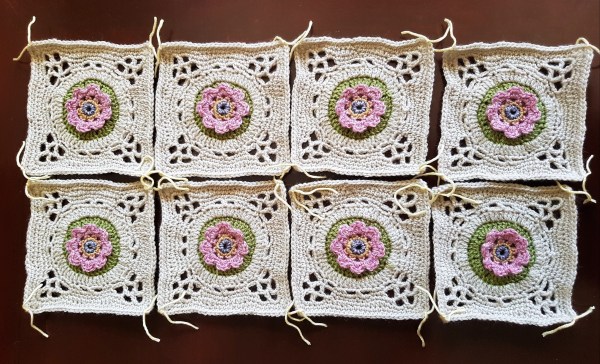
Here is my first set of tiles. (Note that these are not blocked yet as we will be blocking them at the end of the project. Also, the threads you see in the corners are actually being used as stitch markers.)

I find the most efficient approach to making multiple tiles in the same pattern is to first do one completely, so you familiarise yourself with the pattern, and then work on the remaining colour by colour. So, in this set, I did one tile completely, and for the remaining 7 tiles, I first crocheted 7 flowers, then did the green background for all 7, then proceeded to do the parchment part. There is no rule about how you should do this, it’s just a matter of preference.

At the time I started the CAL, the pattern was available in two colour recipes, with another version planned for the second run later in 2020. Of course, you could also come up with your own colour combination. I even saw a monochrome version of the tile which someone tried — and it was quite pretty — but I love colours, so it wasn’t for me. 🙂

If you want to give it a try, the pattern remains available to download, free of charge, from the Stylecraft Yarns website here.

Photo credit: Janie Crow website (janiecrow.com)

See the finished Fruit Garden blankets →

Lockdown crafting – Cross-stitch Sampler

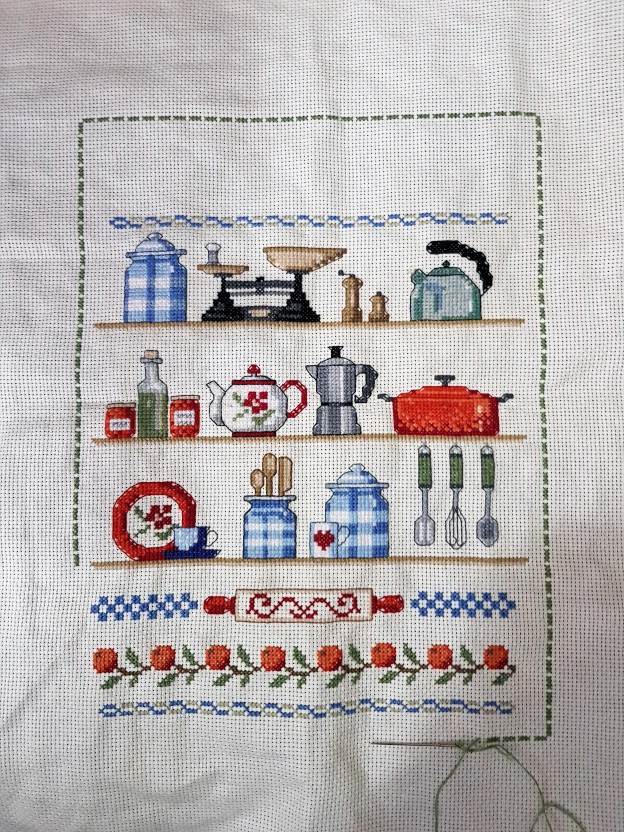
Hey everyone! Hope you are all staying safe in these difficult times. I’ve been busy working on several projects – well, actually, I’m tackling a whole bunch of projects which I started a while back and never completed. Today, I will feature a cross-stitch sampler, which I started last year (and this isn’t the oldest incomplete project I have!!).

Historically, samplers were created by young girls learning how to stitch and years later one could look back and see the advancement in skill. I’ve seen quite a few antique ones available for sale, and not only are they very beautiful, but can be quite valuable. They are wonderful pieces to decorate any room in your home – and hey – why not make one and hand it down as an heirloom?!

If you have not done cross-stitch, I think the easiest way to prepare is to buy a counted cross-stitch kit. This normally includes everything you need – the aida cloth (this is an even weave cotton fabric and usually quite stiff), thread, needle and of course the pattern. Some people also like to use an embroidery ring / hoop – this keeps the fabric taut. I don’t use a hoop, as I think the stiffness of the fabric allows for neat work, but some people say that their work is neater when using it – so I suggest you try both and see what works for you.

The sampler below is from a part-work collection called “The Art of Cross-stitch” – which also covers embroidery and it includes tips, numerous patterns and project ideas.  I think the biggest revelation to me (and I really don’t know why I never thought of this myself before), is that you can create a really clean definition of objects and make them pop in your work by outlining the object with backstitch using a single strand! So simple, right?

Anyway, I hope you find this simple tip useful and I would love to hear from you and see your projects!

On that note, I wish you happy crafting!

Crochet Summer Beach Dress

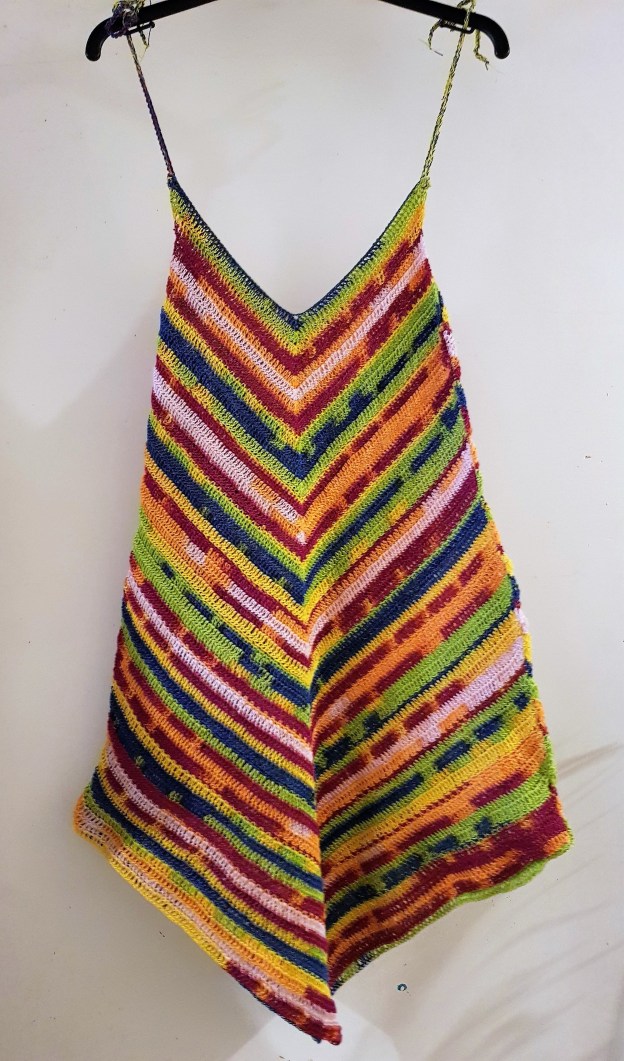
Summer is round the corner — so here is my first creation for summer: a stylish multi-coloured beach dress. It’s made using Katia Jaipur Cake cotton yarn.

The original design was based on a pattern published by Katia. The original pattern link is no longer available, but I later prepared my own written version, including the modifications I made:

Beach Dress – Written Pattern here →

I’ve kept this original post as it was my first version of the dress — and the project that eventually led to the written pattern.

I love variegated yarn like this, as you get a beautiful result even with a simple pattern.

Hope you get inspired by this! Enjoy!!

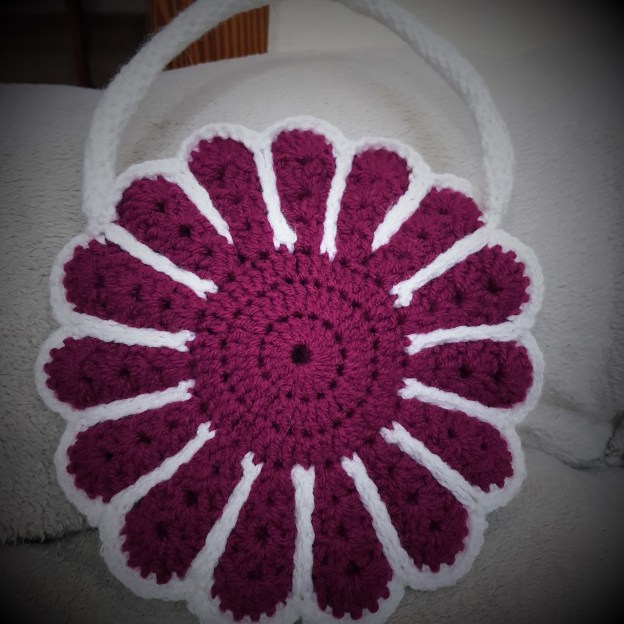
Pretty Petals Little Girl’s handbag

In a previous post called Pretty Petals Coasters →, I shared a cute coaster pattern. I adapted that to make a little handbag for a little girl.

I made four large coasters and joined two together by crocheting the white outline through both layers. That way, I ended up with two rather sturdy sides. I then joined the two sides together using white yarn.

For the handles, I made simple crochet cords, and to finish, I added snap buttons.

Hope this inspires you! Enjoy!

Pastel Flower Baby blanket

I’m so happy with this gorgeous baby blanket, which I made for a friend. It’s using the same technique as in my last post, Colourful Lapghan →.

Granny Square Lapghan

I’ve been rather busy putting this very colourful lapghan together. It’s similar to the Colourful Lined Baby blanket I made some time back. Hope you like it! I’m now working on one in pastel colours. Check back soon for updates!

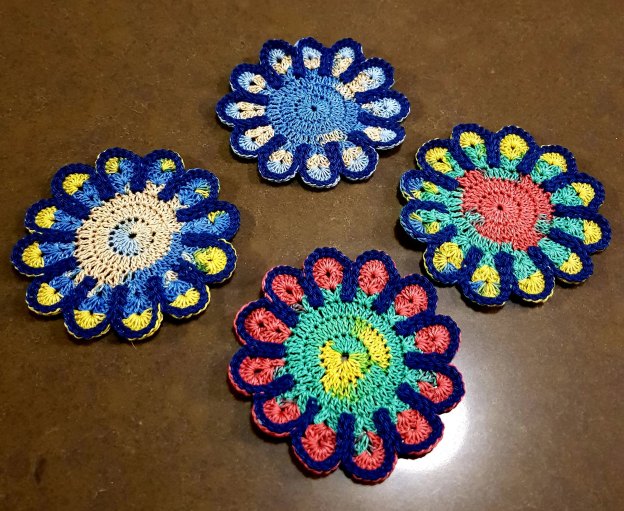
Pretty Petals Coasters

I came across this cute coaster pattern some time back (actually, it’s been a few years!), and I knew I would make them — just not immediately. I guess I was waiting to have the right yarn in hand.

I used a variegated cotton yarn for the flower and then a thicker dark blue cotton yarn for the petal outline. What do you think?

The Pretty Petals pattern is by Naoko Kimura and is available as a free download on Ravelry:

Pretty Petals – Free Pattern →

Enjoy!

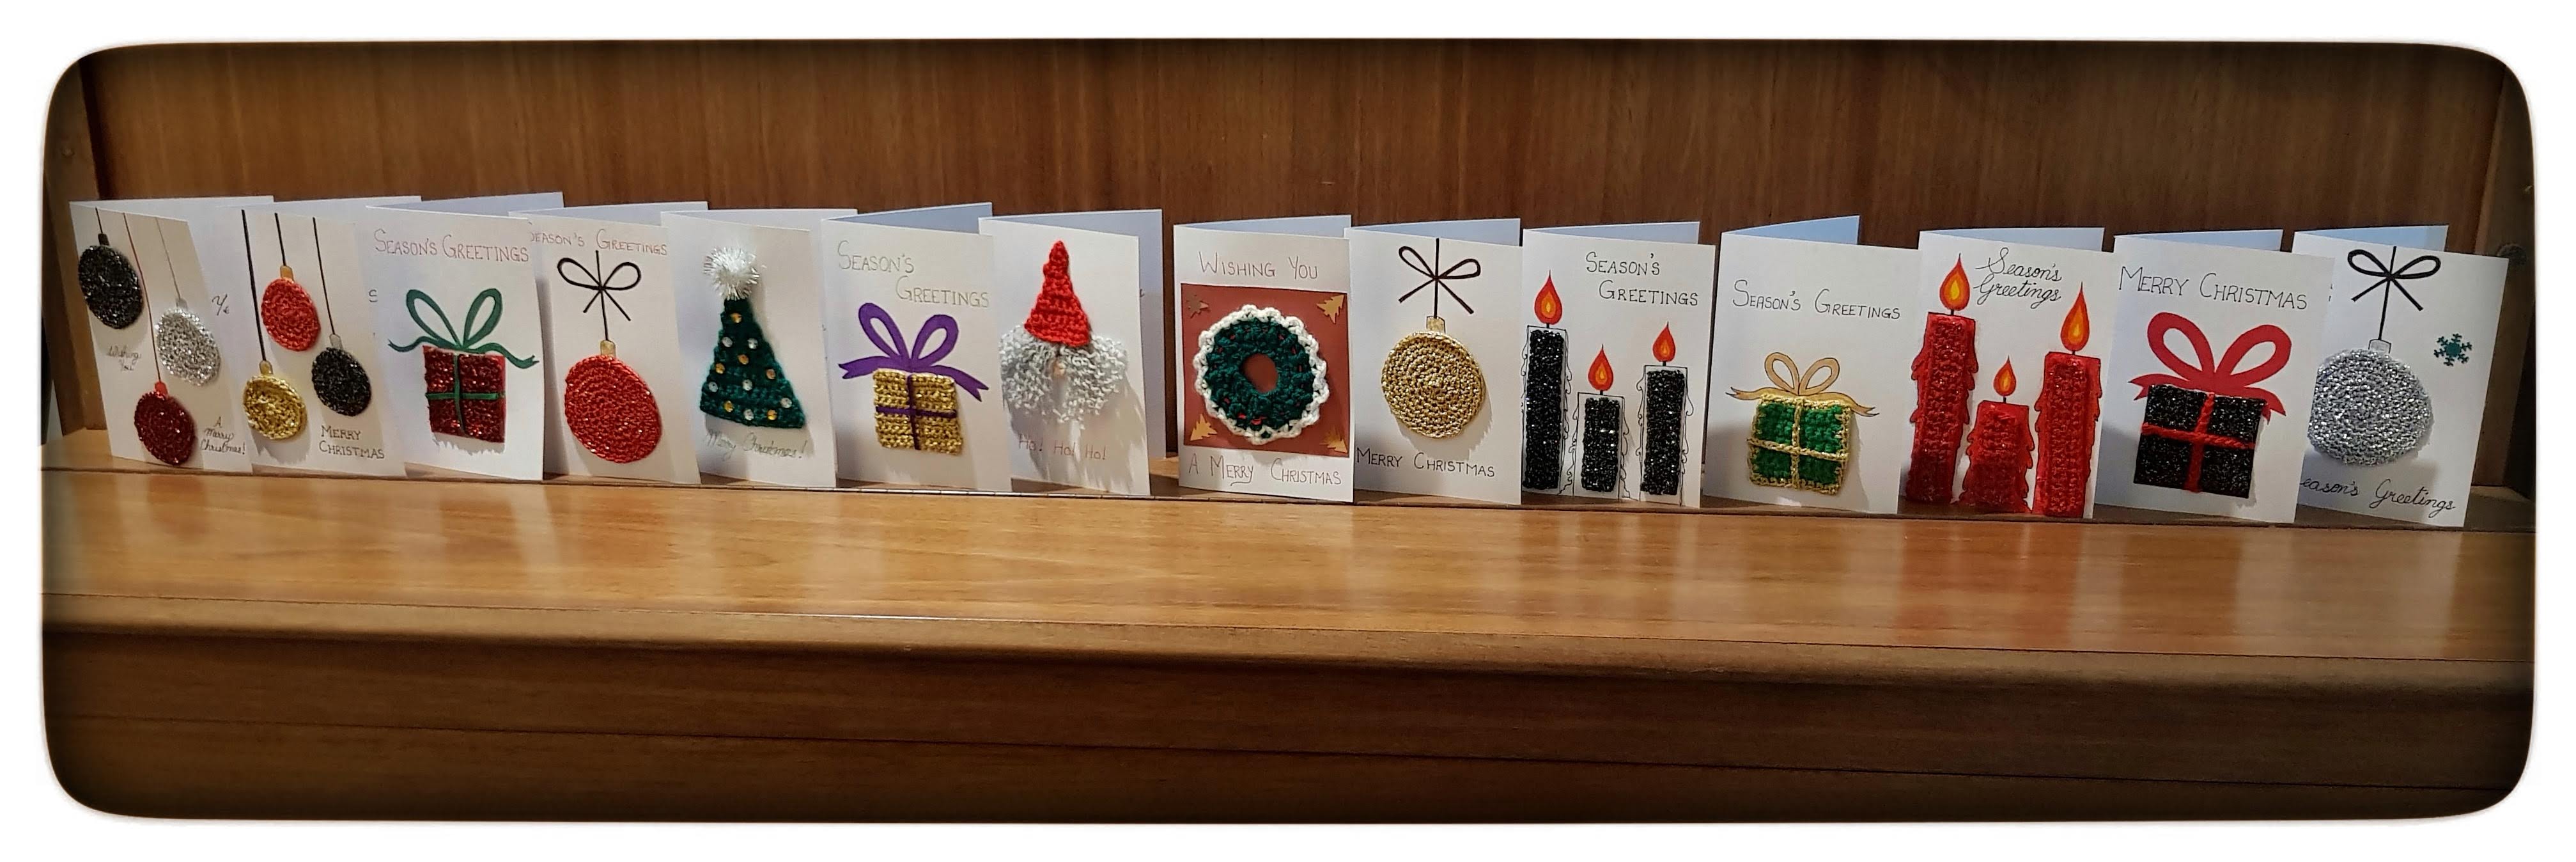
Crochet Christmas Cards

I don’t know about you, but I love real cards – both receiving and sending them. I never throw any cards away, but store them away, and once in a while, enjoy looking through them. So, I decided to try making some Christmas cards with a difference – crochet cards. I had so much fun (as you can see below!) that I’ll definitely be making more for other occasions too. 🙂

20191216_172614-02


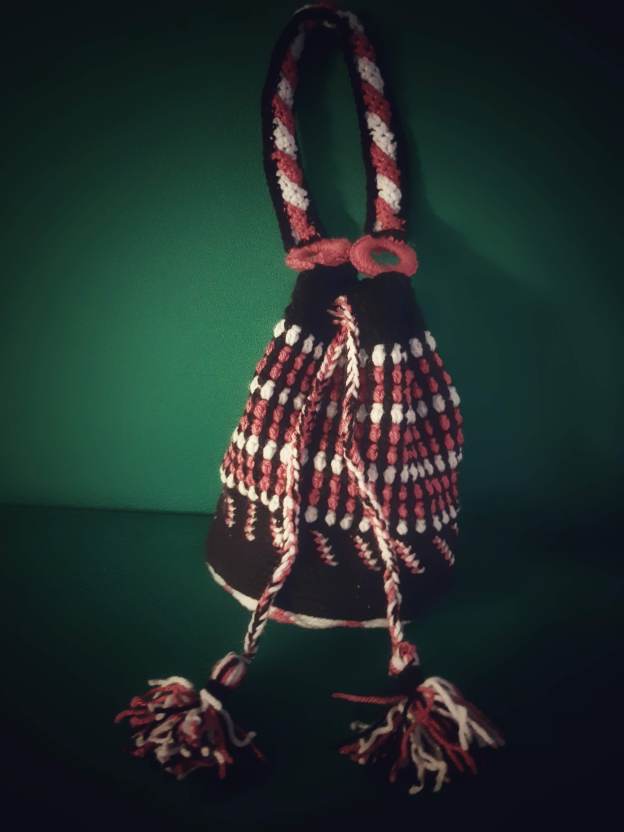
Cute little bag – with tapestry crochet base

A few posts ago, I showed you my very first attempt at tapestry crochet, in which I made a little “bowl”.

Well, I was not satisfied and went on to transform it into a little bag. I did not make the sides using tapestry crochet, but instead made little puff stitches – like the ones used in the infinity scarf which I posted about in my last post. Here it is – what do you think?